Learn Access Now! Previous Section in Chapter 1 Next Section in Chapter 1 Chapter 2
Chapter 1: Getting Started with Access
(This is section 2 of 5 in this chapter)
Using the Access Environment
Before you can work with Access, you need to start the program. You start Access in much the same way as you would any other Windows program. You begin by clicking your mouse on the Start menu, and then choosing Programs. This displays all the programs installed on your system. All you need to do is select the Microsoft Access option from the Programs menu. In a moment, you will see a message welcoming you to Access. At the bottom of the screen, you may see a status bar that displays what is happening while Access is loading.
Once Access has started, you are greeted with a dialog box asking if you want to create a new database or open an existing one, as shown in Figure 1-6.
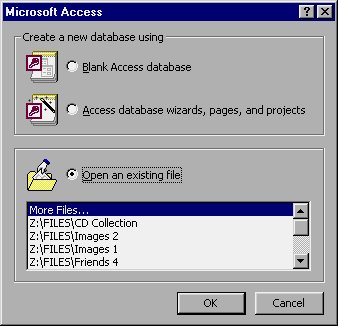
Figure 1-6 You can create a new database or open an existing one.
In Chapter 2 you learn how to actually create a database from scratch. Most of the time, however, you will work with the same databases over and over again, so the bottom of the dialog box lists the last nine databases you have opened, along with a More Files choice.
To see how Access works, let's open one of the sample databases provided with Access. To do this, click your mouse on the More Files option in the bottom of the dialog box, then click on OK. Access displays a standard Open dialog box, shown in Figure 1-7.
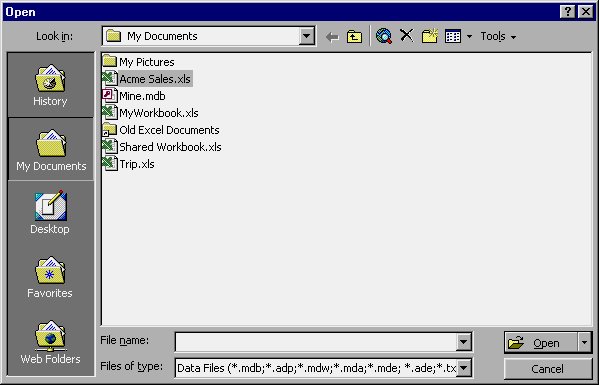
Figure 1-7 The Open dialog box.
The Open dialog box may look familiar to you. It is the same dialog box you use for opening files in virtually every Windows program. All you need to do is make sure you are in the right drive and directory, and then select the file you want to load. In this instance, the sample databases provided with Access are in the Samples subdirectory in the directory where you installed Office. The exact location of the files differs from system to system, depending on how Access was first installed. If you need help figuring out where the sample databases are located, you can use the Find feature in Windows to search for the file Northwind.mdb.
Once you have located and highlighted the file in the Open dialog box, go ahead and click your mouse on the Open button. In a moment, the Access program window appears as shown in Figure 1-8.
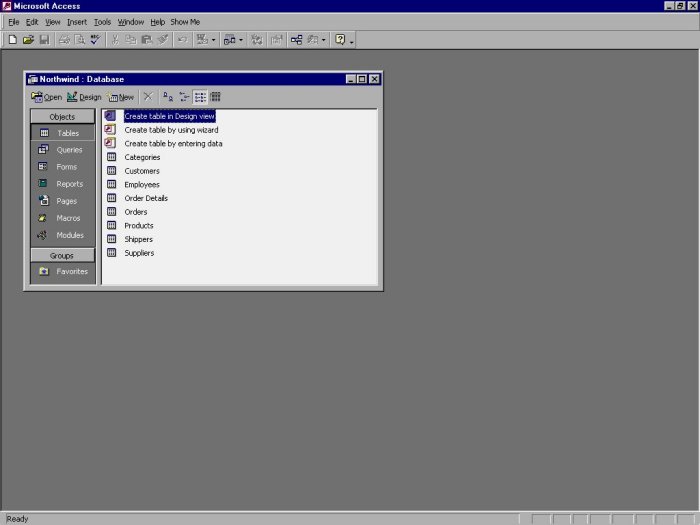
Figure 1-8 The Microsoft Access program window.
Within the Access program window, there are several items to which you should pay attention. The first item is the menu bar, located at the top of the window. As you work with Access, the available menus will change depending on what you are doing at the time. The second item is the toolbar, which appears just below the menu. Toolbar icons let you accomplish common tasks quickly and easily. As you work, Access makes different tools available at different times.
The Database Window
One of the most important parts of the Access environment is the Database window, as pointed out in Figure 1-8. You will see the Database window whenever you create or load a database (as you have just done). Earlier in the chapter, you learned that an Access database can contain tables, forms, queries, reports, and other objects. The Database window lets you select the part of your database with which you want to work. On the left side of the window is a series of buttons which indicate the types of objects you can track in your database. When you click your mouse on one of these buttons, Access shows you a list of the objects in that category. For example, if you look at the Database window in Figure 1-8, you see a list of tables available in the Northwind database. If you click your mouse on the Forms button, you will see a list of forms available, as shown in Figure 1-9.
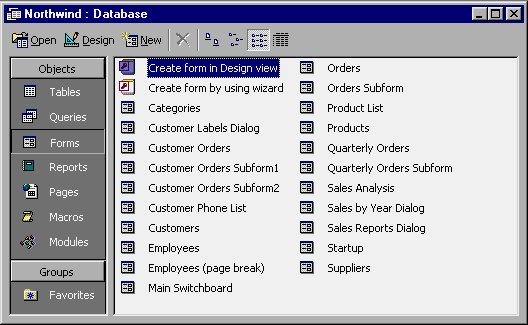
Figure 1-9 The Form button displays the forms available in the database.
Notice that there are quite a few forms available with this database. If there are more objects (such as forms) than can fit in the Database window at one time, Access displays scroll bars in the Window so you can display all the objects in turn.
Understanding Wizards
Access is a very powerful program. With Access, you can manage your data in virtually any way you can imagine. With many database programs, you need to learn esoteric commands or complex procedures in order to use a powerful feature. This is not true with many of the features of Access. To overcome this potential problem, Access uses a series of Wizards which let you accomplish tasks step by step. You invoke many of these Wizards by choosing tools from the various toolbars in Access. Others can be selected from menus, and still others from within the Database window. For example, when you want to create a new table in your database, you simply double-click your mouse on the Create Table By Using Wizard, which is in the Tables list of the Database window (see Figure 1-8). Access then starts the Wizard, the first step of which is shown in Figure 1-10.
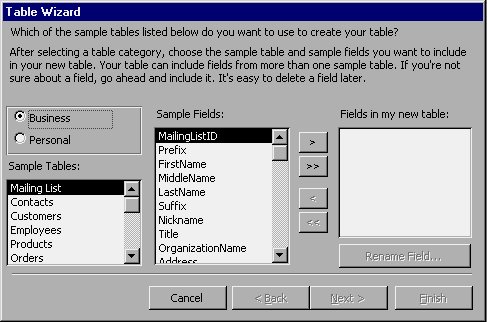
Figure 1-10 An example of a Wizard.
You work through a Wizard by answering the questions posed in the dialog boxes, or by making choices from those presented. You move from step to step by clicking your mouse on the control buttons at the bottom of each dialog box.
Access provides Wizards to help create databases, tables, forms, queries, reports, and graphs. You can use Wizards to help create objects in forms and reports, design mailing labels, and export information. In fact, Wizards are so powerful and make common tasks so easy that they are used throughout this book. Many of the projects you work on will rely on Wizards (at least to begin with).
Getting Help
Access provides quite a bit of help which you can take advantage of at any time you desire. There are three primary ways that Access provides help:
- The Office Assistant
- An online Help system
- ToolTips
The primary way to get help in Access is to simply press F1. Access then displays the Office Assistant, which is an animated guide designed to help you discover answers to common Access problems. You typically use the Office Assistant when you have a particular task you want to accomplish. The assistant leads you through the task, helping you accomplish what you want to do. If, for some reason, the Office Assistant does not appear when you press F1, you can also call up the assistant by choosing Show the Office Assistant from the Help menu.
If you want to access the Help system in Access, you can do so by using the Help menu; it should be available at all times. You can also access the Help system by clicking your mouse on the Microsoft Access Help button on the toolbar. This tool is at the right side of the toolbar; it looks like a question mark within a balloon.
Another helpful feature of Access is context-sensitive help. You start this by choosing the What's This option from the Help menu. When you choose this option and then click your mouse on another item within the Access environment, the Help system displays any helpful information it has available on that topic. For example, if you choose What's This and then click your mouse on another tool on the toolbar, you will get helpful information about the tool. Context-sensitive help is a very powerful feature you can use to get immediate help.
Access also uses a feature called ToolTips. These tips are displayed whenever you move the mouse pointer above a tool on a toolbar. For example, Access displays the ToolTip shown in Figure 1-11 if you move the mouse pointer over the tool that looks like a pair of scissors. The yellow box appearing under the mouse pointer indicates the purpose of the tool.

Figure 1-11 ToolTips help you understand the purpose of different tools.
Learn Access Now! Previous Section in Chapter 1 Next Section in Chapter 1 Chapter 2