Learn Access Now! Chapter 6 Next Section in Chapter 7 Chapter 8
Chapter 7: Printing Your Table
(This is section 1 of 5 in this chapter)
Many computer users don't give much thought to what happens after they get their information in a database. Very often, getting information into a database is only half the story--you also need to worry about printing out information so you can share your data with others.
In this chapter, you will learn how you print the information contained in your database. You will learn concepts that apply whether you are printing a simple table or a complex report. However, this chapter is only the start. Two other chapters in this book deal with Access report writing capabilities. Between these three chapters, you will have all the tools you need to create any type of output you desire.
By the time you finish this chapter, you will understand the following key concepts:
- How to print your table's contents
- How to select a printer
- How to specify the way in which your information should print
- How to print an object's layout
- How to use print preview to save paper
Printing a Table
As just discussed, after you enter data into your table, you will want to print a copy of your table's contents. Access makes it very easy to print the data in your table. One way you can print your table is to follow these steps:
- Choose the Tables button in the Database window.
- Select (highlight) the name of the table you want to print.
- Select the Print option from the File menu or click your mouse on the Print tool on the toolbar.
Another way to print your table is to follow these steps:
- Choose the Tables button in the Database window.
- Select (highlight) the name of the table you want to print.
- Click your mouse on the Open button. Access displays the Datasheet for the table; you can make any changes to the table you desire.
- Select the Print option from the File menu or click your mouse on the Print tool on the toolbar.
Regardless of which method you use, Access understands that you want to print. If you click your mouse on the Print tool on the toolbar, Access tries to print your table right away. If you select the Print option from the File menu, Access displays the Print dialog box, as shown in Figure 7-1.
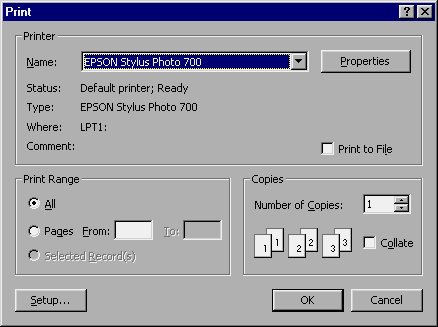
Figure 7-1 The Print dialog box.
The various parts of the Print dialog box control what Access prints. If you want to control which printer Access uses to print your table, use the Name pull-down list at the top of the dialog box. If you want to change specific attributes of the printer, click your mouse on the Properties button. Access, in turn, will display the Properties dialog box for the printer, described later in this chapter.
The Print Range area lets you choose the parts of your table Access prints. You can print your entire table, part of your table (the rows or columns you have selected), or a range of pages. Later in the chapter, you will learn how to preview your printout on your screen before you print it. Using this print preview, you might decide to print a specific range of pages. The Pages option lets you specify a range of pages to print.
The Copies area lets you tell Access how many copies of your information to print. The Collate check box only has meaning if you are printing more than one copy of the table. For example, assume your table takes five pages to print completely. If you need two copies and you have selected the Collate check box, Access will print all five pages of the table (one copy) and then print the five pages again (the second copy). If you don't select the Collate Copies check box, Access prints two copies of each page, in turn. In this instance, you will need to manually collate the copies later.
Finally, in the center of the right side of the Print dialog box is a check box called Print to File. This check box lets you divert your printout from the printer to a disk file. Printing to disk is actually quite powerful. For instance, assume you need to send a report to someone across the country. You can print it out and fax it to them or send it through the mail system. However, if you print the report to a file, you can instead send them the disk containing the file, or you could e-mail the print file to them. If the report is large, sending an e-mail or a disk could save lots of money in shipping charges. As a result, they get the information faster and at a lower cost. When they receive the file, they can send it to their printer and have a copy the same as if you had mailed a printed copy to them.
When you finish telling Access what to print, click your mouse on the OK button. Access will send your information to the printer according to your specifications. If you selected the Print to File check box, Access will ask you for a file name to use, as shown in Figure 7-2.
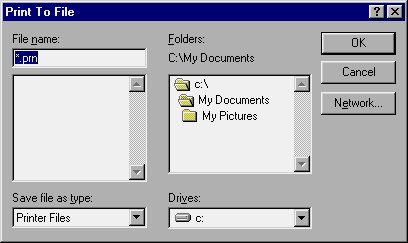
Figure 7-2 The Print To File dialog box.
This is a standard file control dialog box. You can use the controls it provides to select a drive and folder for your output file. All you need to do is type the filename you desire and click your mouse on the OK button. Access will send printer output to the disk file you specified.
If your computer has access to multiple printers or if you need to better control your printout (perhaps by changing your page orientation or margins), you can use the Print Setup dialog box discussed next).
Learn Access Now! Chapter 6 Next Section in Chapter 7 Chapter 8