Learn Access Now! Chapter 9 Previous Section in Chapter 10 Next Section in Chapter 10 Chapter 11
Chapter 10: Using Additional Tools
(This is section 2 of 5 in this chapter)
Using AutoCorrect
If you are a user of Word, Microsoft's popular word processor, you may already be familiar with the AutoCorrect feature. This handy tool has been adapted to Access to help you become more productive in your data entry.
The purpose of AutoCorrect is to automatically change things you type, as you type them. This may sound strange, but it can really be a benefit. For instance, if you know you always misspell a certain word, you can force Access to recognize that word and replace it with the proper one. Similarly, you can define short codes that can be automatically replaced with long words or phrases.
It is this last use of AutoCorrect that is perhaps the most powerful when entering data. For instance, let's say you work for Amalgamated Widgets Worldwide, and you have to enter that name frequently in your data. You could define an AutoCorrect entry that every time you typed aww, it was automatically replaced with Amalgamated Widgets Worldwide.
Adding Entries
To add information to AutoCorrect, choose the AutoCorrect option from the Tools menu. Access displays the AutoCorrect dialog box, as shown in Figure 10-2.
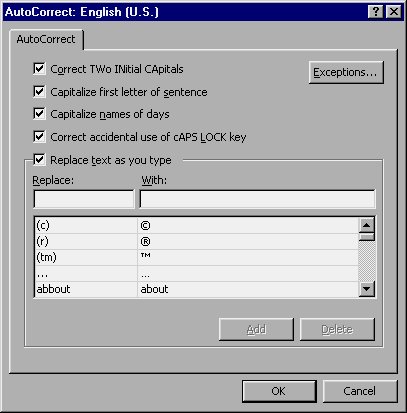
Figure 10-2 The AutoCorrect dialog box controls all the features of this popular tool.
At the top of the dialog box you can control some of the automatic changes which AutoCorrect can make for you; these are pretty much self-explanatory. Near the bottom of the dialog box is a list of AutoCorrect entries. Each entry is made up of two parts; the part on the left is what you would type as you are entering data in a Datasheet or form, and the part on the right is what Access automatically uses instead of what you typed.
For instance, in Figure 10-2 you can see an entry which has two words: abbout and about. If you were to type "abbout" in your text, Access would automatically recognize it and replace it with "about." If you scroll through the list you can see an extensive number of changes which Access is already configured to make.
To add your own custom AutoText entries, you do it using the Replace and With boxes. All you need to do is type in the Replace box what you want Access to recognize and in the With box what you want it replaced with. Continuing the example started in the last section, you would place "aww" in the Replace box and "Amalgamated Widgets Worldwide" in the With box. When you click your mouse on the Add button, Access adds the entry to the AutoCorrect list it uses.
Removing Entries
Just as you can add entries to the AutoCorrect list, you can also delete them. To do this, simply select the entry in the AutoCorrect dialog box (Figure 10-2), and then click your mouse on the Delete button. Access removes the entry from the list and no more automatic changes are made using it.
You should note that Access does not ask you to verify your deletion; it just does it. The deleted information remains in the Replace and With fields right after the deletion, however. This means that if you discover you deleted something you didn't want to delete, you can immediately click your mouse on the Add button to put the entry right back in the AutoCorrect list.
Learn Access Now! Chapter 9 Previous Section in Chapter 10 Next Section in Chapter 10 Chapter 11