Learn Access Now! Chapter 11 Previous Section in Chapter 12 Next Section in Chapter 12 Chapter 13
Chapter 12: Using Web Features
(This is section 3 of 4 in this chapter)
Creating Web Pages
One of the major ways in which Internet capabilities have been melded into Access is in its ability to create Web-page output. Using Access you can create three types of Web pages. The type you should create depends on what type of data you are using and what you ultimately want to do with that data. Access allows you to create these types of Web pages:
- Static HTML. This is the simplest form of Web output you can create. The pages represent a single view of your data at the time the pages are created.
- Server-generated HTML. This type of Web output allows you to work with a specific Web server to create dynamic output that presents your data in a table format. Information in the Web page is generated as of the time the user accesses the page.
- Data Access Pages. These are actually database objects (just like tables, forms, and queries) that allow the complete sharing of information over the Web.
You should note that even though Access makes creating a Web page relatively easy, getting others to see your information on the Web may not be as easy. The biggest hurdle, for many people, is getting access to a Web server where their information can be made available. If your company has such a server, or you have rented space on someone else's Web server, you will need to transfer your Access-created Web materials to the server before they can be accessed by others. In the case of the more dynamic page-creation methods (server-generated HTML and data access pages), you should discuss what you want to do with the Web administrator. They may need to make some changes in how the server functions before you can use these types of pages.
Creating a Static HTML Web Page
Creating a static HTML Web page from an existing database is very easy in Access. All you need to do is either select the database object you want used as the basis for your Web page, or display the information you want used. Then choose Export from the File menu. This displays the Export dialog box shown in Figure 12-8.
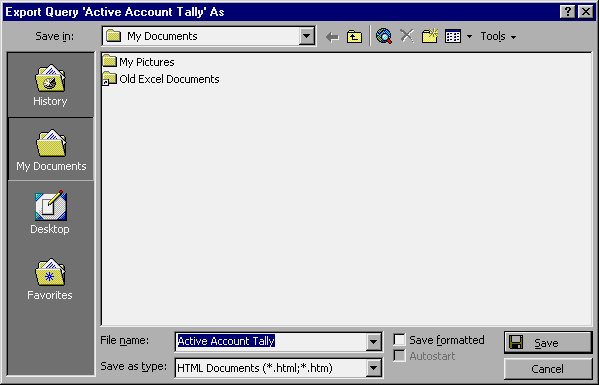
Figure 12-8 The Export dialog box.
At the bottom of the Export dialog box, you should make sure that you are saving your files as HTML documents (see Figure 12-8). You should also make sure the Save Formatted check box is selected; this ensures that Access writes the information out in fully functional HTML format. You can then use the other controls in the Export dialog box to specify a file name for the Web page you are creating, as well as a location.
Once you click your mouse on Save, Access quickly displays the HTML Output Options dialog box, shown in Figure 12-9.
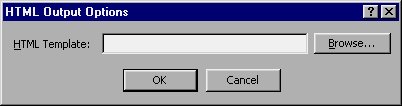
Figure 12-9 The HTML Output Options dialog box.
Access is asking for the location of an HTML template file. This is a file, peculiar to Access, that defines how a Web page should be constructed. Template files can help enhance the appearance of your Access Web pages. Unfortunately, the template files are something you must create by hand; they are not created automatically by Access. On the plus side, they are not mandatory to the creation of Web pages using Access.
Note: For more information on HTML template files, use the index of the Access online Help system to search for "HTML template." Using the information provided there, along with your knowledge of how to hand-code HTML files (or a very good HTML tutorial book), you can create your own template file, if desired.
Once you have designated which template file (if any) you want to use, click your mouse on the OK button. (If you don't have a template file, as in this instance, leave the HTML Template box blank and click your mouse on the OK button.) Access then generates the Web page according to your specifications. As an example, Figure 12-10 shows an example query Datasheet in Access, while Figure 12-11 shows the Web page generated by Access from that query.
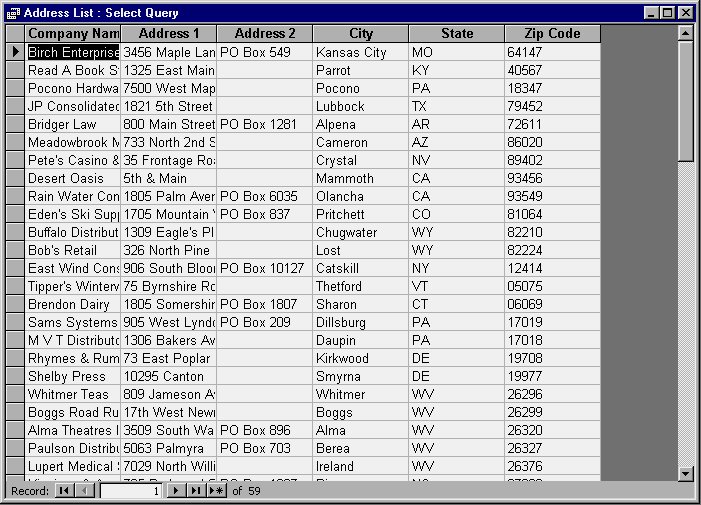
Figure 12-10 A sample query Datasheet in Access.
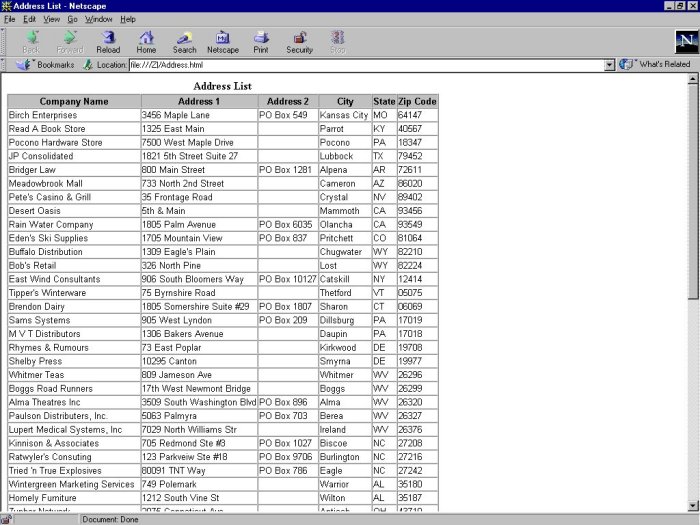
Figure 12-11 The same information from an HTML file, in a Web browser.
You should note that the Web page shown in Figure 12-11 was viewed on a system that did not even have Access 2000 loaded on it. This means that anyone with a Web browser will be able to view your information without any problem.
Note: Exactly how your information is displayed may differ from one browser to another. Standards within the Web leave it up to the browser to determine how characteristics are displayed. Thus, one browser may display columns or fonts or bold text a bit differently than is done in a different browser. It is impossible for Access to anticipate and overcome these differences.
Creating Server-generated HTML Web Pages
One of the enhanced Web pages you can create with Access is referred to as server-generated HTML Web pages. Notice that these are server-generated pages. That should give you the first clue that the display of the information is dependent on the server, not on Access itself. In a Microsoft-centric world, this means that you must use one of Microsoft's Internet Information Server (IIS) platforms on a Windows NT Server system in order for others to access your data using these types of pages. As long as you are using that type of Web server, you can use these types of Web pages.
Note: Make sure you don't confuse the server with the browser. The key component here is the Web server; as long as the server is IIS, any browser can access server-generated HTML Web pages from Access.
Because generation of this type of Web page is server-dependent, most of the work in making the information available on the Web must be done by your Web administrator, not by you. If your administrator needs help in this area, any good Internet Information Server book should include help on setting up and publishing ASP or IDC/HTX pages from Access data.
Creating Data Access Pages
Data access pages are a new feature in Access 2000. These pages are not dependent on a particular Web server (as you learned about in the previous section), but are instead dependent on the use of Internet Explorer 5, the latest version of Microsoft's Web browser. (IE5 is provided with Microsoft Office 2000, of which Access 2000 is a component.)
In reality, data access pages are saved as an object in your Access database, just like your tables, queries, and forms. There are two ways you can create data access pages: using a Wizard or from scratch. The following sections detail both approaches.
Using a Page Wizard
To create a data access page, first display the Database window and click your mouse on the Pages button. You can then double-click your mouse on the Create Data Access Page by Using Wizard option. Shortly Access displays the Page Wizard dialog box, as shown in Figure 12-12.
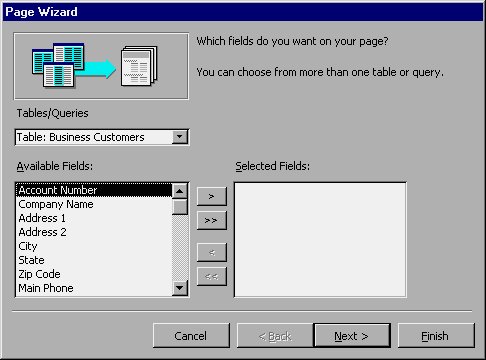
Figure 12-12 The Page Wizard dialog box.
At the left side of the Page Wizard dialog box, you can use the drop-down list to specify what Access should use as the source for this new data access page. Remember that you can use either tables or other queries as your source. In Figure 12-12, the Business Customers table is selected. (This is a table developed earlier in this book.)
In the lower-left portion of the dialog box is a list of all the fields defined in the selected table or query. If you change the data source in the pull-down list, then the available fields change, as well. You can use the list, and the controls just to the right of the list, to indicate which fields you want included in the data access page you are creating.
For the purposes of this example, select the Company Name, Address 1, Address 2, City, State, and Zip Code fields. Make sure that after selecting each one, you click your mouse on the > button. Access then displays the name of each field in the Selected Fields list at the right side of the dialog box. When you are done selecting these fields, the dialog box appears as shown in Figure 12-13.
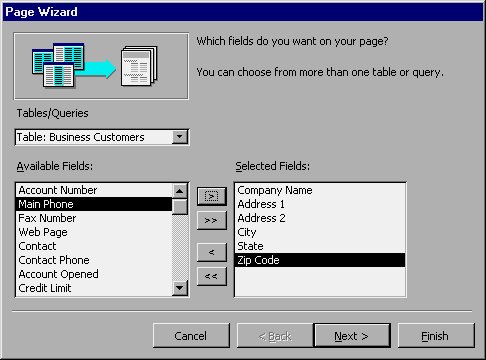
Figure 12-13 The Page Wizard dialog box after selecting some fields.
With the fields selected, you are ready to proceed to the next step in the Wizard. Click your mouse on the Next button, and Access displays the dialog box shown in Figure 12-14.
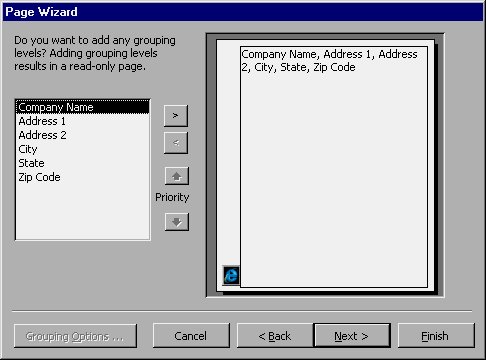
Figure 12-14 Picking which fields to group by.
Your next step is to determine if you want your information grouped in any particular order. Grouping is routinely done in reports, and should be done based on the intended use of your data. For instance, if you were creating a data access page showing sales for a particular company, you might want the information in the report grouped by month, by salesperson, or by territory.
In this example, it might be helpful to group your customers by state. To do this, simply choose the State field at the left side of the dialog box and click your mouse on the > button. Access changes the Report Wizard dialog box to show how your grouping will now occur, as shown in Figure 12-15.
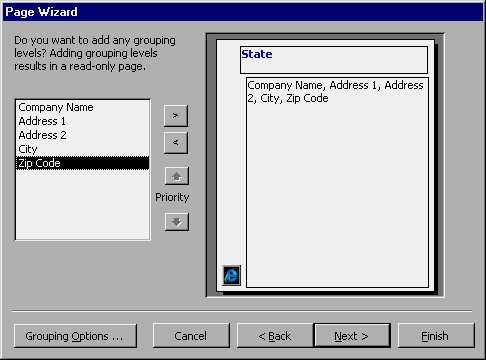
Figure 12-15 Grouping helps you organize the output in a data access page.
Notice that the State field is moved to the top of the sample layout, and the Grouping Options button becomes active. For some types of output you may want to change the grouping options. Doing so allows you to specify how Access should analyze the field by which you are grouping. In this case, changing the grouping options is not necessary.
To proceed to the next step, click your mouse on the Next button. Access displays the dialog box shown in Figure 12-16.
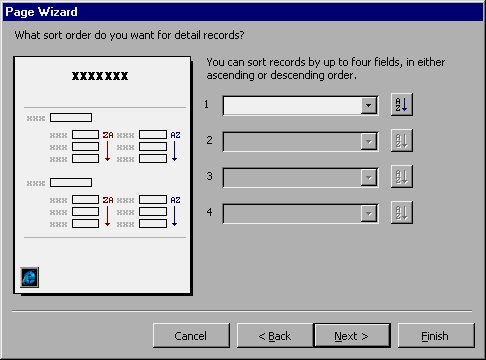
Figure 12-16 Picking which fields to sort by.
Now you need to decide how you want your information sorted. Access allows you to specify up to four fields by which sorting can be done. In most instances you will use only one or two fields. It makes sense that if you are creating a list of your customers, you would want them in alphabetical order by name. Thus, you should choose the Company Name field.
Use the pull-down list for the first sort field to select the Company Name field. If desired, you can click your mouse on the order button to the right of the field to indicate whether Access should sort the field in ascending order (the default) or descending order.
When you are done picking the fields you want to sort by, you can click your mouse on the Next button to proceed to the next step. Access displays the dialog box shown in Figure 12-17. This is the final dialog box in this Wizard.
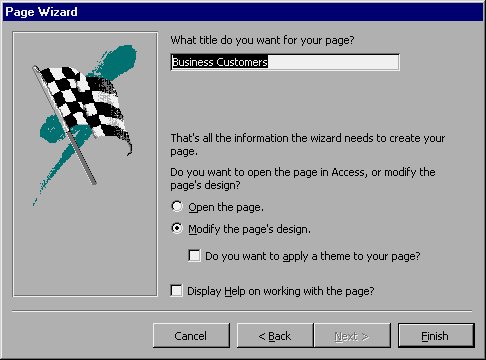
Figure 12-17 The final dialog box for the Page Wizard.
Here you can enter a name that you want used to save your data access page. The suggested name is simply the table name on which the page is based (Business Customers). Change the name to Customer Addresses, by State. Next, click your mouse on the Open the Page option button, then click on the Finish button. Access displays the results of your page, as shown in Figure 12-18.
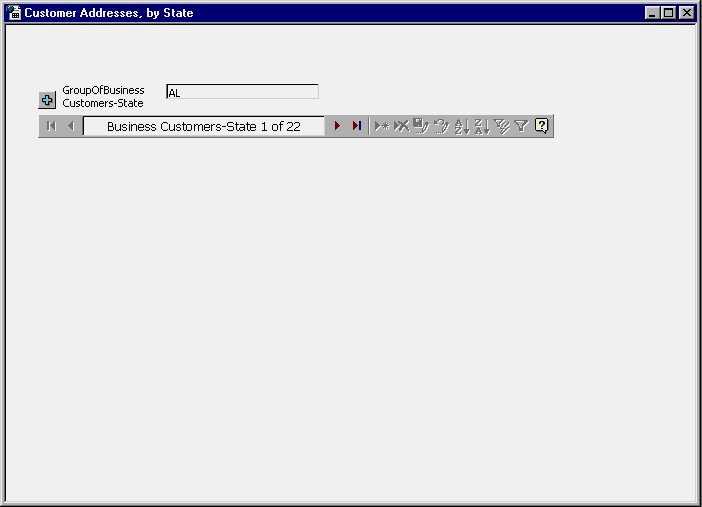
Figure 12-18 The results of the Page Wizard.
This viewing is being done solely in Access, not in a browser. When you are done looking at the information in the page window, close it by clicking your mouse on the Close icon in the upper-right corner of the window. Access asks you if you want to save changes to the data access page. If you click your mouse on Yes, you will see the Save As Data Access Page dialog box, shown in Figure 12-19.
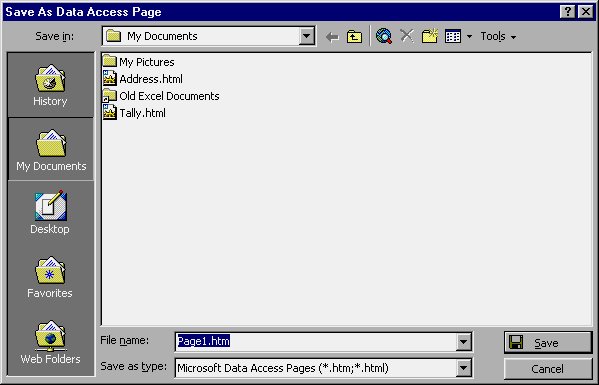
Figure 12-19 Saving your HTML page.
Here you need to provide a name for the data access page you are creating. This is the name that will be used for the actual HTML file you will publish on your Web server. You should supply the name, then click your mouse on Save. Access generates the page and saves it in the Database window.
Later, someone can access the file from within Internet Explorer 5 (see Figure 12-20). Notice that the controls look almost exactly the same as what you see in Figure 12-18. The user can now use these controls to navigate through the data in the table.
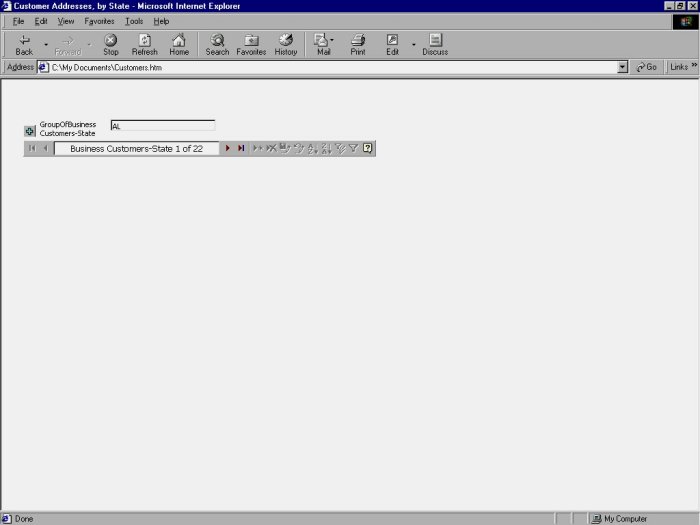
Figure 12-20 Viewing a data access page in the Web browser.
Designing Pages from Scratch
To create a data access page from scratch, first display the Database window and click your mouse on the Pages button. Then double-click your mouse on the Create Data Access Page in Design View option. Access displays the Design view window for data access pages, as shown in Figure 12-21.
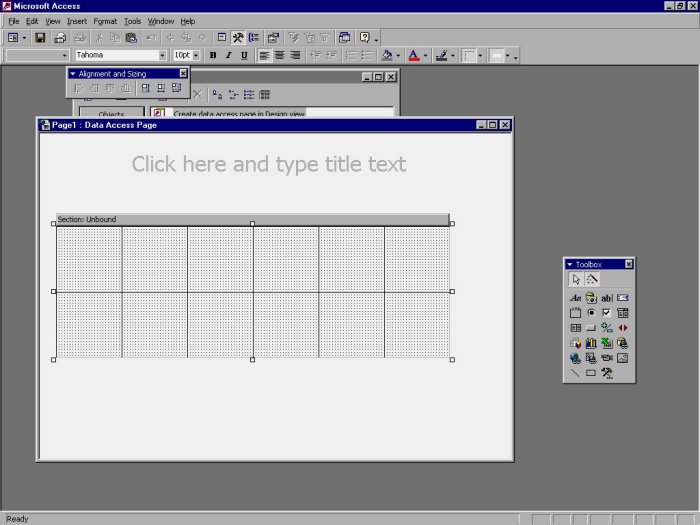
Figure 12-21 Creating a data access page from scratch.
Notice that this Design view page is very similar to what you use to create both reports and forms from scratch. You can use many of the same techniques you learned in Chapter 9, "Creating Custom Forms," and that you will learn in Chapter 14, "Creating Complex Reports," in creating data access pages from scratch.
The first task you need to do is bind a data source to the data access page. This data source can be either a table or a query. You do this by first choosing Properties from the View menu. Access displays the Properties dialog box for your page. Click your mouse on the Data tab in the dialog box, and Access displays it as shown in Figure 12-22.
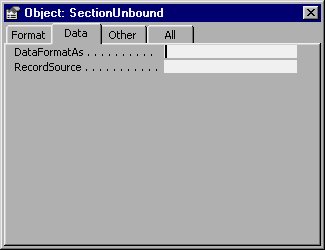
Figure 12-22 The Properties dialog box.
When you select the RecordSource property, a pull-down list becomes available. Using the pull-down list, pick a table or query you want to use. For this example, I selected the query named "Active Davis Accounts Over $1,000," which was developed earlier in this book. Access then displayed a field list for the query, as shown in Figure 12-23.
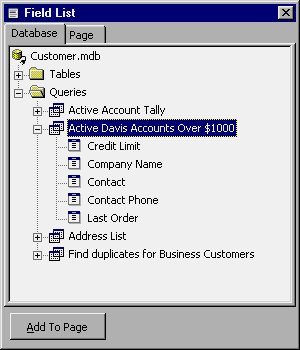
Figure 12-23 The Field List dialog box.
To add fields to the data access page, select the fields desired and click your mouse on the Add To Page button in the Field List dialog box. Once the desired fields are added, you can close the Field List dialog box and focus on the layout of your page. You do this by using the tools in the Toolbox to add elements to the page, as desired.
When you are through designing your data access page, click your mouse on the Close icon in the upper-right corner of the Design window. Access asks you if you want to save the page. When you click your mouse on Yes, you are given the opportunity to specify a name and location for the page, using the Save As Data Access Page. (See Figure 12-19.) Once saved, your page appears in the Database window of Access as a Page object. The page can also be viewed using Internet Explorer 5 by anyone that has access to the page.
Conducting a NetMeeting
Microsoft NetMeeting was originally a module used with Internet Explorer. It has been integrated into Office 2000 programs to facilitate the sharing of files over the Internet. Much of the technical information about using NetMeeting is beyond the scope of this book, but it is helpful to understand the basics and how you can use NetMeeting with Access.
Access makes it easy for you to both schedule and be involved in online meetings. If you want to schedule a NetMeeting, using Outlook, you simply need to choose Online Collaboration from the Tools menu, and then choose Schedule Meeting. The exact steps you may go through from this point depend on many variables, including how you have Outlook configured on your system. If you are familiar with Outlook, however, you should be able to follow the on-screen directions to schedule your meeting.
Note: The NetMeeting portion of Access relies very heavily on modules originally in other Microsoft programs such as Internet Explorer and Outlook. If you have not used those programs, it will be very difficult for you to understand and use the features originally belonging to those programs, even if they are now accessible from Access. For more information, refer to any good Outlook or Internet Explorer book.
If you use Outlook in your office, you may have received a reminder concerning an online NetMeeting. To join the meeting, all you need to do is click your mouse on the Start NetMeeting button. If you want to decline the meeting, click your mouse on the Dismiss button. (Both of these buttons are available in Outlook.)
If you don't use Outlook, but you have NetMeeting running in the background on your system, you may have received a notice that you are invited to a meeting. If this is the case, click your mouse on Accept to join in the meeting. Running Microsoft NetMeeting in this way (in the background) is done not from within Access, but directly from the Windows desktop.
Participants in a NetMeeting can see and comment on the database under discussion. If you are the host of an online meeting (the person that started the meeting), you have ultimate control over the database. You can allow others in the meeting to make changes to the database, as desired. Others in the meeting can see any changes being made, as they are made.
Learn Access Now! Chapter 11 Previous Section in Chapter 12 Next Section in Chapter 12 Chapter 13