Learn Access Now! Chapter 20 Previous Section in Chapter 21 Next Section in Chapter 21
Chapter 21: Putting It All Together
(This is section 2 of 7 in this chapter)
Forms in the Database
In designing forms for the CD database, my goal was to make using the system as simple as possible. Therefore, I decided to use a two-pronged approach. First, I developed a switchboard menu form; I would later start this form with an AutoExec macro. (An AutoExec macro is one that automatically executes when a databases is first opened.) This form has four simple choices on it, as follows:
- Add Music
- Review Music
- Print CD List
- Exit
I implemented these four choices using command buttons, tied to macros which run the appropriate form or report. Figure 21-2 shows how my Startup form appears; this is the form that implements the switchboard menu.
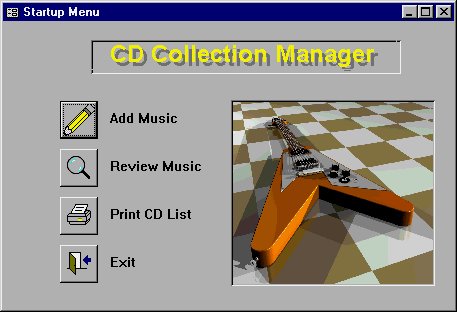
Figure 21-2 The Startup form.
On my Startup form, I placed four command buttons to run macros that would allow me to use other database objects. (The next four sections describe the actions that were tied to each of the command buttons.) My form also includes an unbound OLE object: a picture of a guitar. This picture is a GIF graphic file that I inserted in an OLE frame.
Note: The term "unbound OLE object" may sound foreign. When something is described as "unbound" in Access, it simply means it has not been associated with a data source. In this case, the OLE object is unbound because it is not meant to be associated with data, but with a non-changing picture.
Add Music
When I click my mouse on the Add Music command button, the Add CDs macro runs. This macro has only two actions, OpenForm followed by GoToRecord. The OpenForm action opens the Music Input form in Edit mode. The GoToRecord action then jumps to a brand new record for the form.
The Add Music option and the Review Music option both use the Music Input form. I built the form around the Sorted Collection query, described later in this chapter. The form consists of two major parts: information from the CD Collection table (through the Sorted Collection query) and information from the Individual Tracks table. I implemented the form using a form and subform arrangement, as shown in Figure 21-3.
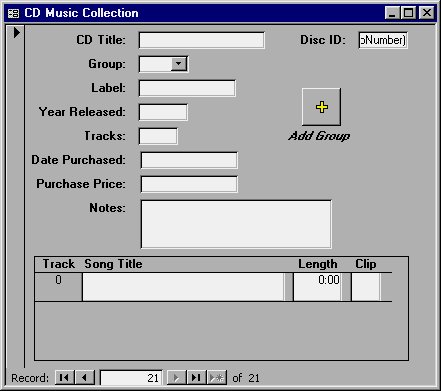
Figure 21-3 The Music Input form.
The Subform
The subform is a direct window into the Individual Tracks table. The form displays only those tracks which correspond to the Disc ID. The definition of the subform is in the Track List form. This form displays four fields from the Individual Tracks table, even though another field is defined on the form as a hidden field. Figure 21-4 shows what this form looks like. (This form is shown in its Design window so that you can see the hidden field.)
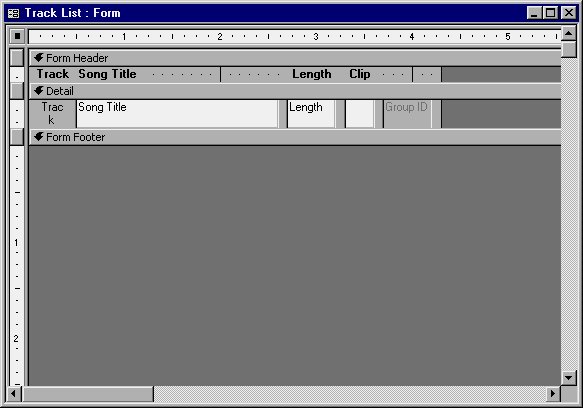
Figure 21-4 The Design window for the Track List form.
If you try to use this form by itself, the form does not work as you would want it to--instead, it simply displays all the tracks in the Individual Tracks table. I designed the form for use with the Music Input form where it is set up to display only those tracks for a particular CD.
The Track List form is based on the Sorted Tracks query, described later in this chapter.
Adding Groups
Notice that the form uses a Combo Box object for the musical group. If you click your mouse on the pull-down arrow, you will see a list of groups which have been defined in the database. These are, of course, saved in the Groups table. To select an existing group, you simply select it from the list. To add a group (or groups), you click your mouse on the Add Group command button. When you do, Access executes a macro called Click on Add Group. This macro is very similar to the Add CDs macro. It contains two actions: OpenForm and GoToRecord. However, Access opens the Add Groups form this time. This form allows you to add records to the Groups table. Figure 21-5 shows what this form looks like.
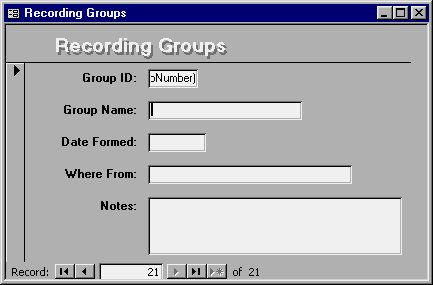
Figure 21-5 The Add Groups form.
When you close this form, Access again displays the Music Input form. Access makes any groups you added with the Add Groups form immediately available in the Combo Box object.
Review Music
When you click your mouse on the Review Music command button, Access executes the Review CDs macro. This single-line macro opens the Music Input form, described earlier in the chapter. The only difference is that the macro now opens the form with the Data Mode argument set to Read Only. This means that by using this menu option, you can only review the information in the database. Figure 21-6 shows how the Music Input form appears when opened read only.
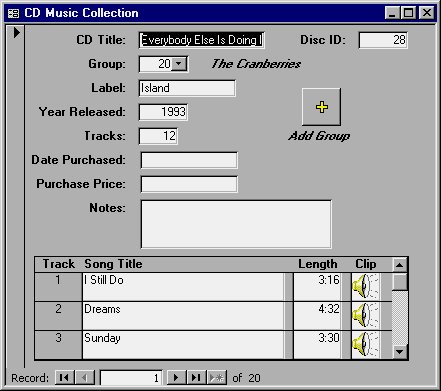
Figure 21-6 The Music Input form with a record displayed.
Notice that the subform, which displays information from the Individual Tracks table, is filled in at the bottom of the screen. If you double-click your mouse on the OLE icon in the Clip column, a music clip plays.
When you double-click your mouse on an OLE icon, the macro called Play OLE Clip executes. This macro uses the RunCommand action to play the sound clip.
Print CD List
The Print CD List option does not display a form, but rather prints a report that lists your CDs. The macro itself, called Print Report, is very similar to the conditional macro you developed in Chapter 18, "Creating and Using Macros." The macro first checks to see if there are any records in the Individual Tracks table. If there are not, then the macro ends. Otherwise, the macro proceeds to the next step.
The first two macro actions turn screen echoing off and display the mouse pointer as an hourglass. Then the OpenReport action prints the report named Collection Report (the Collection Report is described fully later in this chapter). After the report is printed, the screen updating turns back on and the mouse pointer returns to normal.
Exit
The Exit command button ties to a macro called Exit, which uses the Close action to close the open form. When you select the Exit button, the current form is the Startup form, which contains the switchboard menu. As such, Access closes your access to the database.
Learn Access Now! Chapter 20 Previous Section in Chapter 21 Next Section in Chapter 21