Learn Access Now! Chapter 1 Previous Section in Chapter 2 Next Section in Chapter 2 Chapter 3
Chapter 2: Access in an Hour
(This is section 2 of 7 in this chapter)
Creating a Table
After you have created your database, you need to create at least one table. Access uses tables to define the structure of the data in your database. Each table contains a collection of related information. Access makes it easy to construct tables. Access also provides a Table Wizard to help you create common types of tables. You will use the Table Wizard to create your first database table.
Note: Make sure you don't confuse a table with a database. In some software, a database is simply a list of information, much like a table in Access. However, a database in Access is much more than a table. For more information, refer to Chapter 1.
Starting the Table Wizard
Before you start the Table Wizard, make sure that the Tables button is selected in the Database window (your screen will appear as shown earlier in Figure 2-3). Then, double-click your mouse on the Create Table By Using Wizard option. Momentarily, you should see the Table Wizard dialog box shown in Figure 2-4. In this dialog box, Access asks you to select the type of table you want to create.
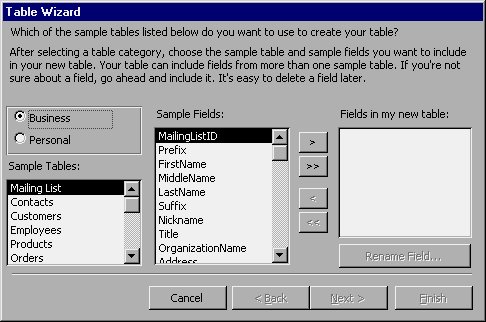
Figure 2-4 Picking the type of table to create.
Before you select a table type, take a minute to look at the Table Wizard dialog box. This dialog box is similar to other Wizard screens: at the top is some help information, in the center is where you make your choices, and at the bottom are the Wizard control buttons. You use these buttons to move from one step in the task to the next. The purpose of these buttons is shown in Table 2-1.
| Button | Meaning | |
|---|---|---|
| Cancel | Stops the Wizard; no action is taken. | |
| Back | Returns to the previous step (if available). | |
| Next | Proceeds to the next step (if there is one). | |
| Finish | Ends the Wizard; completes the action with the available information. |
Table 2-1 The Wizard control buttons.
Notice that at this point only one of the control buttons is available; the others are dim. Access makes only those control buttons available which have meaning at the current time. Thus, the Back button is not available because there is no previous step; you are at the first step right now. The Next and Finish buttons are not available because you need to make some choices before the Wizard can progress.
Picking a Table Category
At this particular step of the Table Wizard, Access asks you to specify the type of table you want to create. Notice that there are two choices--Business and Personal--in the center of the left side of the dialog box. The button you select affects the types of tables listed in the Sample Tables list. Just for practice, select the Business button. Notice that there are many different sample tables listed. You can view all of them using the scroll bar at the right side of the Sample Tables list. Table 2-2 describes the different sample business tables which the Table Wizard can create.
| Sample Table | Meaning | |
|---|---|---|
| Mailing List | Creates a simple or complex mailing list. | |
| Contacts | Tracks your sales contacts. | |
| Customers | Manages your business customers. | |
| Employees | Maintains information about your company's employees; can work with the Expenses and Time Billed sample tables. | |
| Products | Develops your own inventory database. | |
| Orders | Tracks orders for your products. | |
| Order Details | Tracks order details (individual line items); works in relation to the Orders sample table. | |
| Suppliers | Tracks your vendors. | |
| Categories | Builds a category list which you can use in conjunction with other tables. | |
| Payments | Records payments made by your customers. | |
| Invoices | Maintains information about invoices generated. | |
| Invoice Details | Tracks invoice details (individual line items); works in relation to the Invoices sample table. | |
| Projects | Tracks the projects on which you or your employees are working; works in relation to the Time Billed sample file. | |
| Events | Develops lists of special events; works in conjunction with the Reservations sample table. | |
| Reservations | Manages reservations for a particular event; works in conjunction with the Events sample table. | |
| Time Billed | Tracks time expended on projects; works with the Projects, Employees, and Expenses sample tables. | |
| Expenses | Maintains a history of expenses related to specific projects; works with the Projects and Employees sample tables. | |
| Deliveries | Tracks deliveries of your product; can be related to the Customers, Orders, and Employees sample tables. | |
| Fixed Assets | Develops a list of the fixed assets owned by your company. | |
| Service Records | Logs when a service is performed on an asset; can work with the Fixed Assets and Employees sample tables. | |
| Transactions | Maintains a record of business transactions performed; can work with the Payments sample table. | |
| Tasks | Tracks a list of tasks to be accomplished. | |
| Employees And Tasks | Builds relationships between the Employees and Tasks sample tables. | |
| Students | Maintains information about students (or employees) and their classes. | |
| Students And Classes | Builds relationships between the Students table and a sample Classes table. |
Table 2-2 Business tables which can be created with the Table Wizard.
Note: Remember that the sample tables used in the Table Wizard are just that--samples. However, you can modify them slightly while you are using the Table Wizard. Also, you can later change the design of any table created with the Table Wizard.
Since you want to create a database of your personal friends, you will need to select the Personal category. To select this group of sample tables, click your mouse on the Personal option button. As shown in Figure 2-5, Access changes the list of sample tables.
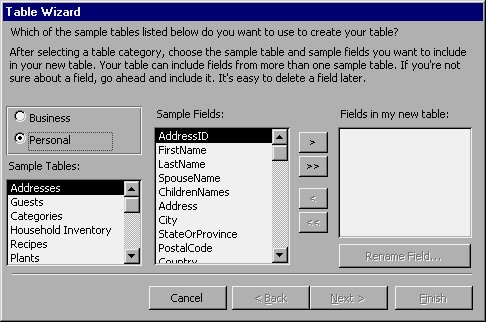
Figure 2-5 The Table Wizard after displaying the Personal sample databases.
Scroll through the sample tables. You will see that the Table Wizard can create many different personal tables. For a list of these tables, refer to Table 2-3.
| Sample Table | Meaning | |
|---|---|---|
| Addresses | Creates a mailing list of your friends and acquaintances. | |
| Guests | Tracks guests invited to a social event. | |
| Categories | Builds a category list which you can use in conjunction with other tables. | |
| Household Inventory | Maintains a record of your belongings for insurance purposes. | |
| Recipes | Manages your favorite quiche, fondue, and other recipes. | |
| Plants | Tracks the contents of your greenhouse or backyard jungle. | |
| Exercise Log | Records exercises you have done and calories burned. | |
| Diet Log | Manages your diet on a meal-by-meal basis. | |
| Wine List | Tracks your favorite wines and vineyards. | |
| Rolls of Film | Logs the rolls of film you shoot; you can use it with the Photographs sample table. | |
| Photographs | Maintains a log of your photographs; you can use it with the Rolls of Film sample table. | |
| Authors | Lists your favorite authors; you can use it with the Book Collection sample table. | |
| Books | Tracks books in your personal library; you can use it with the Authors sample table. | |
| Groups | Lists group photographs and any notes you have about them. | |
| Service Records | Logs when a service is performed on an asset; with some modification, this table can work with the Household Inventory sample table. | |
| Recording Artists | Lists your favorite artists; you can use it with the Recordings sample table. | |
| Recordings | Tracks your recorded music; you can use it with the Artists sample table. | |
| Video Collection | Organizes your video tapes and laser discs. | |
| Accounts | Manages your investment accounts; works with the Investments sample table. | |
| Investments | Tracks your individual investments; works with the Accounts sample table. |
Table 2-3 Personal tables which can be created with the Table Wizard.
Take a moment to select different sample tables. As you use the mouse to highlight different sample table names, notice that Access changes the information in the Sample Fields list.
To create a table to keep track of the names, addresses, and phone numbers of your friends, highlight Addresses in the Sample Tables list. (There is a good chance that this option is already highlighted; it is the first option in the list.) You are now ready to select the fields that will appear in your table. Your screen should appear as shown earlier, in Figure 2-5.
Choosing Types of Information to Include
Within your table, you will specify the fields, or pieces of information, you want to track. The middle column, labeled Sample Fields, is where you specify the fields you want to use in your table. Remember from Chapter 1 that fields define the type of information Access maintains for each record in your table. Thus, at this point, you are defining the type of information you want to keep on each of your friends and acquaintances. Table 2-4 shows the fields from which you can make your selection.
| Field | Meaning | |
|---|---|---|
| AddressID | A unique numeric ID for your friend's address | |
| FirstName | Your friend's first name | |
| LastName | Your friend's last name | |
| SpouseName | The name of your friend's spouse | |
| ChildrenNames | The name of your friend's children | |
| Address | Your friend's street address | |
| City | Your friend's city | |
| StateOrProvince | Your friend's state or province | |
| PostalCode | Your friend's ZIP code | |
| Country | Your friend's country | |
| EmailAddress | Your friend's electronic (Internet, Prodigy, and so on) mail address | |
| HomePhone | Your friend's home phone number | |
| WorkPhone | Your friend's work phone number | |
| WorkExtension | Your friend's extension at work | |
| MobilePhone | Your friend's mobile (cellular) phone number | |
| FaxNumber | Your friend's fax line phone number | |
| Birthdate | Your friend's date of birth | |
| SendCard | An indicator of whether you want to send a birthday card to this friend | |
| DateLastTalkedTo | Date you last had contact with your friend | |
| DateUpdated | Date of last change to the database record | |
| Nickname | Any nicknames or preferred names for your friend | |
| Notes | Any comments or notes you may want to include | |
| Hobbies | Any of your friend's hobbies or interests | |
| HealthIssues | Any of your friend's health problems | |
| Photograph | A photo of your friend |
Table 2-4 Sample fields available for the Addresses sample table.
The Table Wizard provides 25 sample fields for the Addresses sample table. However, you don't need to use all of them. Instead, you should pick the fields you think you want to maintain. Remember, you will need to keep the information up-to-date for it to be of value. The more fields you select, the more fields you must maintain.
To select a field, highlight the field name and then click your mouse on the button with the greater than symbol (>). Access, in turn, will move your selected field to the third column in the dialog box, which is labeled Fields In My New Table. Since you will probably want to include at least the first names, last names, addresses, and phone numbers of your friends, highlight each of these fields in the Sample Fields list. Then, after each is highlighted, click your mouse on the > button. When you are done, the dialog box should appear as shown in Figure 2-6.
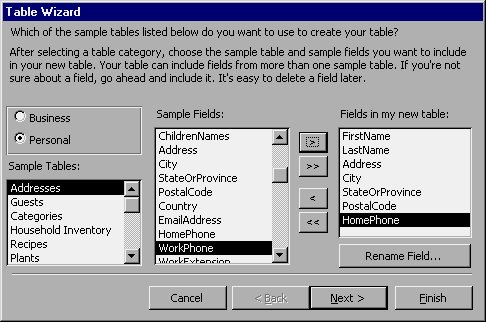
Figure 2-6 After specifying a few fields for your table.
If you make a mistake, don't despair. You can use the dialog box buttons between the second and third columns to manipulate each of the fields you will include. Table 2-5 lists these buttons and their purposes.
| Button | Purpose | |
|---|---|---|
| > | Includes a field from the Sample Fields column in your table. | |
| >> | Includes all fields from the Sample Fields column in your table. | |
| < | Removes a field from your table. | |
| << | Removes all fields from your table. |
Table 2-5 Field selection buttons.
Note: You can move fields around in your table by removing them and then adding them again. Access adds a selected field to your table immediately after whatever field is highlighted in the third column.
Include whatever fields you deem necessary for your table. Make any modifications you desire until you have completely defined the field order you desire. Before moving on, make sure that you add the AddressID field to your table. This field assigns a primary key to your table. In the following two sections, you will learn the importance of adding the AddressID field. When you are done, click your mouse on the Next button to tell Access you are through with this step and ready to move on. Access will display the next step dialog box shown in Figure 2-7.
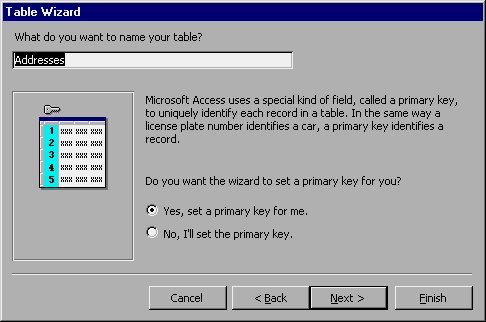
Figure 2-7 The next step in the Table Wizard.
Naming Your Table
You are nearly finished defining your table. However, Access needs to know a few more pieces of data before it can proceed. At the top of this dialog box, Access asks you to name your table. Don't confuse this name with the name you gave your database when you first created it. Here you are naming your table, and the database you already created can contain many such tables. For this example, you will accept the default name (Addresses).
In this dialog box, you also specify whether you want Access to use a primary key for your table. A primary key is a field that Access uses to sort your table. Generally, a primary key should be unique, meaning that there will only be one record with any given primary key; Access will not let you add a record if it has the same primary key as another record.
For example, if you have three friends with the last name Smith, you cannot use the last name as a primary key. Likewise, if all your friends live in Seattle, you cannot use the city as a primary key. However, since your friends probably have unique phone numbers, you could use the phone field as the primary key.
You can set the primary key one of two ways. You can let Access set a key for you (this is the default), or you can specify the key yourself. Make your choice and then click your mouse on the Next button.
Understanding Keys
A primary key defines how Access orders information in your table. Even though you don't need to define a primary key, Access will function more efficiently if you do. Using a primary key, Access can locate and display records very quickly. This improved performance will be more important as you add more records to your database.
Access lets you define both unique keys and non-unique keys. Using a unique key is best because it improves searching time. However, there may be situations in which a unique key is not possible. For example, you may want to use a city name as the key. Since there are many cities with the same name, you would want to specify this as a non-unique key.
In addition, you can use multiple fields to define your key. However, you cannot use the Table Wizard to do so. Instead, you must create the table manually. You will learn how to do this in Chapter 4, "Creating Another Database."
When you choose a field to use as a primary key, you should select a field that is as close to unique as possible, regardless of whether you allow duplicates or not. For instance, you would not want to use the FirstName or LastName field as the primary key; there can be way too much duplication in these fields. On the other hand, you probably could use the HomePhone field since there is much less chance for duplication in this field.
Defining a Key
If you let Access define your primary key automatically (at the end of the previous section), you can skip this section entirely and proceed to the next one. If you set the key yourself, you will see the dialog box shown in Figure 2-8.
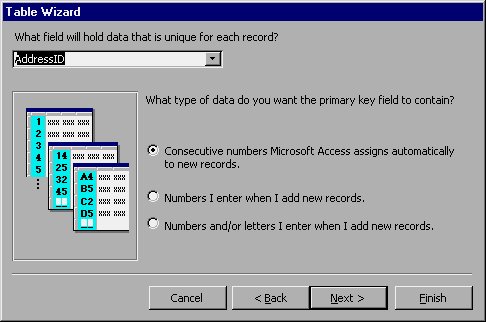
Figure 2-8 Setting up the key for your table.
Using this dialog box, you can select which field Access will use as the key. Access suggests a field to use (the first one in your table layout), but you can select a different one by clicking your mouse on the drop-down arrow at the right side of the field. For this example, make sure the AddressID field is selected.
Note: If you forgot to include the AddressID field in your table layout, you can use the Back button to return to the dialog box where you define fields. (You will need to click your mouse on the button twice.) Add the field and then use the Next button to return to this dialog box.
Next, the dialog box asks you to specify how you want Access to treat the primary key. You have three choices:
- Consecutive numbers Microsoft Access assigns automatically to new records. If you choose this option, you will never need to fill in the primary key; Access will do it for you as you add records.
- Numbers I enter when I add new records. If you select this option, you can enter the primary key manually. However, the key must still be unique, and it must contain only numbers.
- Numbers and/or letters I enter when I add new records. This is the same as the previous option except that you can enter both letters and numbers.
The primary key option you select depends on how you plan to use the primary key. If you only want a counter (a key whose value corresponds to the record number: 1, 2, 3, and so on), select the first option. However, if your primary key will be something else, choose one of the other options. When you are done, click your mouse on the Next button.
Finishing Your Table
To finish your table, you must now answer two more questions. Both questions regard what you want to do when the Table Wizard is done. At this point, you should see the dialog box shown in Figure 2-9.
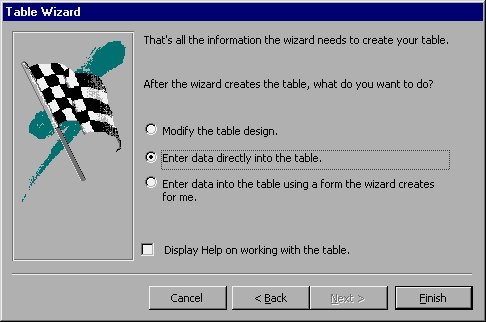
Figure 2-9 Finishing up the Table Wizard.
In this dialog box, you specify what you want to do next. Your choices are as follows:
- Modify the table design. Select this option if you want to continue refining the design of your table.
- Enter data directly into the table. Select this option if you want to use the Datasheet view to enter information in your table.
- Enter data into the table using a form the Wizard creates for me. Select this option if you want the Wizard to create a data input form for your database table.
In Chapter 9, "Creating Custom Forms," you will learn how to work with forms. Right now, choose the second option (which is the default). If you feel you need step-by-step hand-holding while using Access, you can choose the Display Help check box at the bottom of the dialog box.
As soon as you click your mouse on the Finish button (notice the Next button is no longer available; there are no further steps), the Table Wizard creates the table according to your specifications. You will know the Wizard is done when you see the Datasheet view of your table on the screen.
Note: Congratulations on designing your first database and table. In other database systems, what you have just accomplished could take hours. Your table is now ready for you to enter information, and you are fast on your way to becoming proficient with Access.
Learn Access Now! Chapter 1 Previous Section in Chapter 2 Next Section in Chapter 2 Chapter 3