Learn Access Now! Chapter 15 Previous Section in Chapter 16 Next Section in Chapter 16 Chapter 17
Chapter 16: Ensuring Data Security
(This is section 4 of 7 in this chapter)
Using the User-Level Security Wizard
As you can probably imagine, setting up user-level security can be an overwhelming task. Fortunately, Access includes a User-Level Security Wizard which can pay attention to the details for you and get you started. The Wizard implements a rather simple security system, based on only two groups: Administrators and Users. For many implementations of Access, particularly in small companies, this may be more than adequate. If you have more complex security needs, then using the User-Level Security Wizard can provide a good starting point for your security efforts.
To start the Wizard, make sure you have opened the database you want secured. Then choose the Security option from the Tools menu. On the resulting submenu, choose the User-Level Security Wizard option. The Wizard begins, displaying the first dialog box, shown in Figure 16-8.
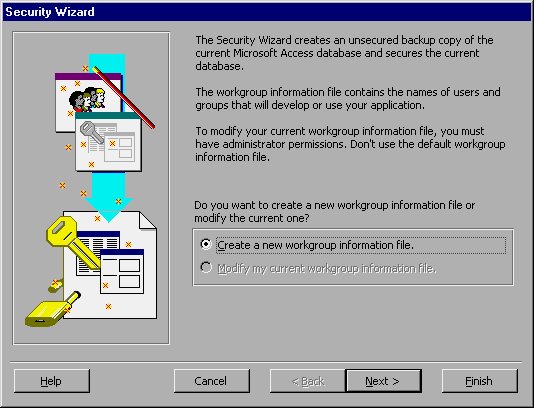
Figure 16-8 The Security Wizard dialog box.
Here you are asked if you want to create a new workgroup information file for your database. Typically, this is a good idea. In fact, if this is the first time you are using the User-Level Security Wizard, it may be the only option you can choose (see Figure 16-8). Click your mouse on the Next button to proceed to the next step, as shown in Figure 16-9.
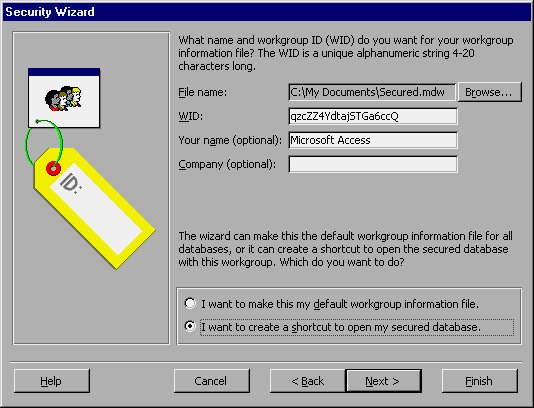
Figure 16-9 Specifying a workgroup ID.
As you will learn later in this chapter, when you create a workgroup information file, you must assign it a unique workgroup ID (WID). The WID must be between 4 and 20 characters in length, and you can set it to any value you desire. When you use the User-Level Security Wizard, Access can create a WID for you automatically, as you can see in Figure 16-9. This dialog box gives you the opportunity to change the WID if you so desire. For now, you should accept the default WID. Later in this chapter you will learn how to create workgroup information files for yourself, and the ramifications of selecting a WID.
You can also specify in this dialog box other information about how the workgroup information file should be created and how Access should treat it. If you want, you can specify the new file to be the default workgroup information file (not a particularly good idea), or you can create a desktop shortcut to open this secured database (this is quite handy).
To continue, click your mouse on the Next button. Access displays the dialog box shown in Figure 16-10.
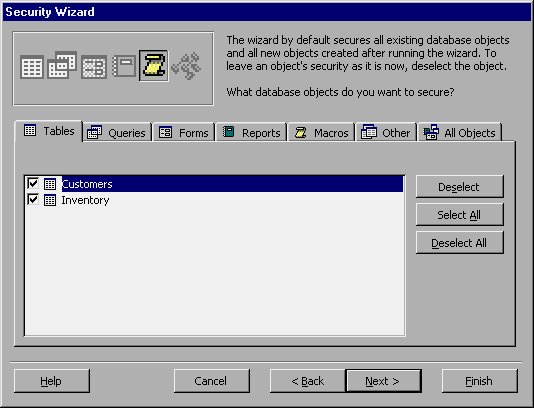
Figure 16-10 Picking objects to be secured.
When you run the User-Level Security Wizard, it assumes you want to secure all the objects in the database you had open when you ran the Wizard. The purpose of this dialog box is to give you the opportunity to specify which objects you don't want secured. You should use the tabs in the dialog box, along with the check boxes beside each database object, to indicate any objects you don't want secured. Unless you have a compelling reason to not secure an object, it is generally a good idea to leave them all secured. If you need to change the permissions for a specific object at a later time, you can do so using the information provided later in this chapter.
Click your mouse on the Next button to proceed to the next step of the Wizard. Access displays the dialog box shown in Figure 16-11.
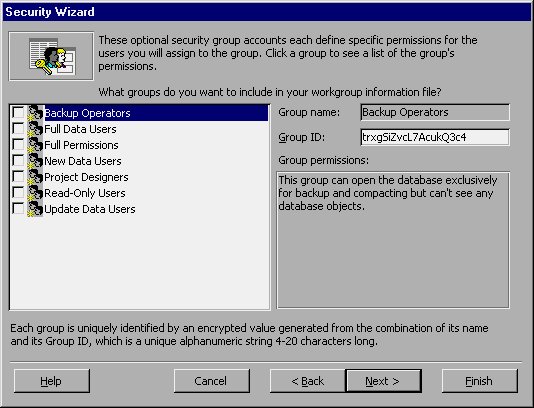
Figure 16-11 Creating optional user groups.
Earlier in this chapter you learned a bit about user groups. The User-Level Security Wizard allows you to easily create additional user groups that have different permissions to use your database. This dialog box allows you to specify which additional groups are to be created. Remember that the Wizard automatically creates both an Admins group and a Users group, besides those you select here.
You can select which ever groups you feel compelled to use. If you do not envision assigning any users to a particular group, then it makes no sense to create that group. Make your selections and click your mouse on the Next button to go to the next step. Access displays the dialog box shown in Figure 16-12.
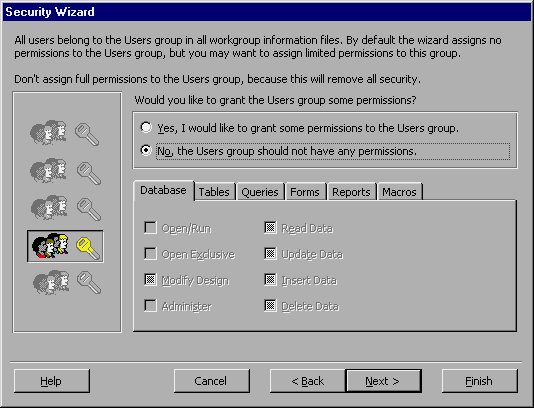
Figure 16-12 Assigning permissions to the Users group.
The default Users group created by the Wizard has a certain number of permissions granted to it. You can modify which permissions the Wizard assigns by using the dialog box shown in Figure 16-12. Click your mouse on the Yes option button to change the permissions, and then use the tabs and the check boxes to make your changes. (You may want to refer back to Table 16-1 to refresh yourself on what each permission does.) When you are done, click your mouse on the Next button to proceed to the next step. Access displays the dialog box shown in Figure 16-13.
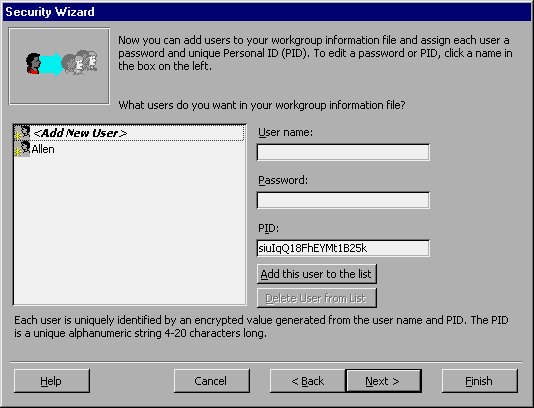
Figure 16-13 Creating users in the workgroup information file.
Using this dialog box you can identify the names of the individual users you want created for your workgroup information file. By default, you are created as a user, but no one else is identified. If you know the names of the people that will be working on this particular database file, create user accounts for each of them here. All you need to do is enter the user name in the User Name box, and supply a password in the Password box. It is best to let Access generate the PID (personal ID) for each user you define, although you can override the PID with one of your own choosing.
Another task you should do is to select your own user account in the dialog box and change the password for that account. The default is for the Wizard to set up your account without a password, but good security practice dictates that you set up a password. The reason is quite simple. Anyone who does a little bit of study of how Access handles security (for instance, if they read this chapter), understands that the administrator's account is set initially to be the name of the person that runs this Wizard. (In Figure 16-13 you can see that this is me, Allen.) Someone could figure out my name and simply provide that name when they log in to Access. Without a password, there is nothing to stop them from doing this. Not setting a password for this account would be a huge hole in your security plans.
It is good to remember that you can always add users to the workgroup information file at a later time, if desired. Once all your users are defined and you have set your own password, click your mouse on the Next button to proceed. Access displays the dialog box shown in Figure 16-14.
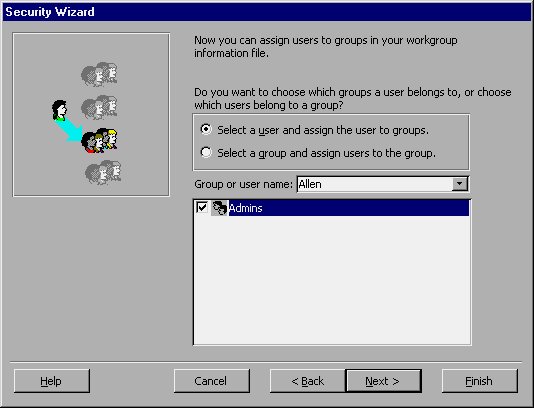
Figure 16-14 Assigning users to groups.
Now you get to assign users to specific groups. If you did not create any optional user groups, this step is very easy. By default, users belong to the Users group, so the only thing you need to do is pick which other groups they belong to. The easiest way to do this is to choose the Select a Group and Assign Users to the Group option button. Then you can use the pull-down list to pick each of your groups in turn. The check boxes in the body of the dialog box are then used to signify which users belong to each of the groups.
When you are done, click your mouse on the Next button. Access displays the final step of the Wizard, as shown in Figure 16-15.
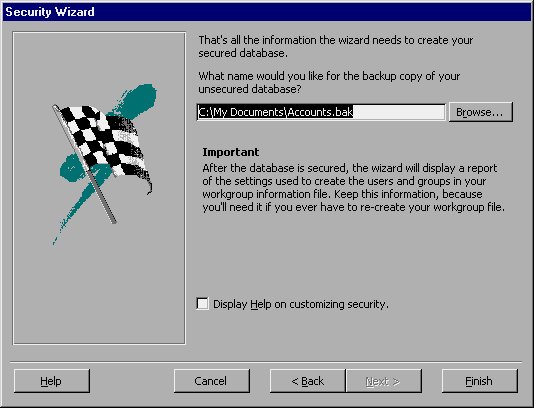
Figure 16-15 Naming your backup file.
In this step you simply indicate the name you want to use for your backup database file. The backup is created, of course, in case you want to delete the new secure database and start over with the unsecured version. (It also comes in handy in case the power goes out while the Wizard is applying your security settings to the database.)
In most cases you can simply select the default backup file name. When you click your mouse on the Finish button, Access secures the database. Access also creates a report that shows what security was applied to the database. Access displays this in a print preview window, as shown in Figure 16-16.
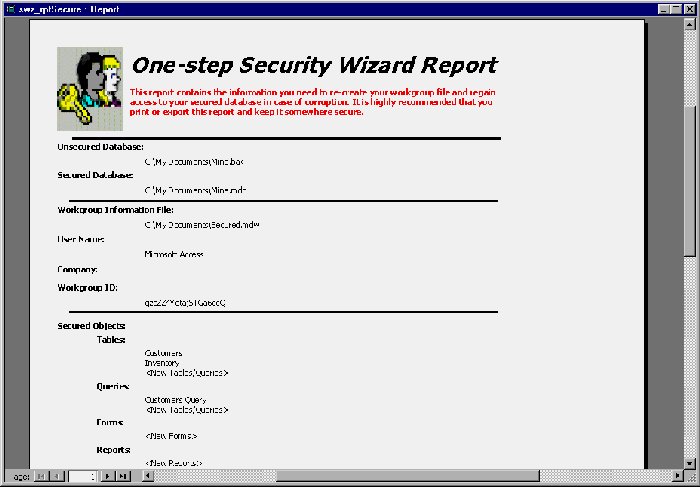
Figure 16-16 The Wizard's security report.
It is interesting that the name of the report is "One-step Security Wizard Report." Not only is this not the name of the Wizard (it is the User-Level Security Wizard), but there was more than one step involved in using the Wizard. Regardless, the information in the report is very beneficial. Thus, it is a good idea to print the report and file it in a secure location. That way you always know how security was applied to the database.
Learn Access Now! Chapter 15 Previous Section in Chapter 16 Next Section in Chapter 16 Chapter 17